
The short answer: Passkeys replace passwords with a key pair: the private key stays on the user's device or syncs through their password manager, and your server stores only the public key. To add them to a web app, use the WebAuthn API (
navigator.credentials.create()to register,navigator.credentials.get()to sign in) through a maintained library such as SimpleWebAuthn, verify every response on the server against a one-time challenge, your origin and your relying-party ID, and offer passkey autofill on the username field. Roll them out alongside existing sign-in methods, prompt users to create one after a normal login, and keep a solid account-recovery path.
Passwords have had a long and mostly unhappy run. Users reuse them, forget them, type them into convincing fake login pages, and store them in spreadsheets. Developers hash them, salt them, rate-limit them, add one-time codes on top, and still spend a surprising share of support time on "I can't log in." Every major breach headline adds a few more million to the pile of leaked credentials that attackers try against every other site.
Passkeys are the first replacement that has a real chance of making passwords optional for ordinary users. They're supported by the major operating systems, browsers and password managers, they sync across a user's devices, and the sign-in experience is often a single fingerprint or face scan. More importantly for developers, they remove whole categories of attacks rather than making them slightly harder.
This guide is for web developers adding passkeys to an existing app. It explains what a passkey actually is, the two ceremonies you implement (registration and authentication), how to use autofill so users barely notice the change, what to store, and the rollout and recovery decisions that matter more than the code.
Passkeys, explained
A passkey is a public-key credential created under the WebAuthn standard. When a user creates one for your site, their device generates a new key pair just for your site. The private key never leaves the user's authenticator: a phone, a laptop's secure hardware, a password manager, or a security key. Your server receives and stores only the public key.
To sign in, your server sends a random challenge. The authenticator signs it with the private key after the user unlocks it with a fingerprint, face scan, PIN or device password. Your server checks the signature with the stored public key. No shared secret ever crosses the network, and there's nothing on your server worth stealing for reuse elsewhere.
Three properties make this more than a cosmetic change:
- Phishing resistance. Each passkey is bound to your site's domain (the relying-party ID). The browser simply won't use it on a look-alike domain, so a convincing fake login page gets nothing.
- No reusable secrets on the server. A database breach exposes public keys, which can't be used to sign in anywhere.
- No credential stuffing. Every passkey is unique to one site, so leaked credentials from other sites are useless against yours.
Synced and device-bound passkeys
Early hardware-based authentication tied a credential to one physical device: lose the security key, lose the credential. Passkeys changed the user experience by allowing the private key to sync through the user's platform account or password manager, so a passkey created on a phone is available on their laptop too. Device-bound passkeys still exist, typically on hardware security keys, and are preferred in some high-security settings. For most consumer and business apps, you'll see a mix of both, and your code mostly doesn't need to care which kind it received.
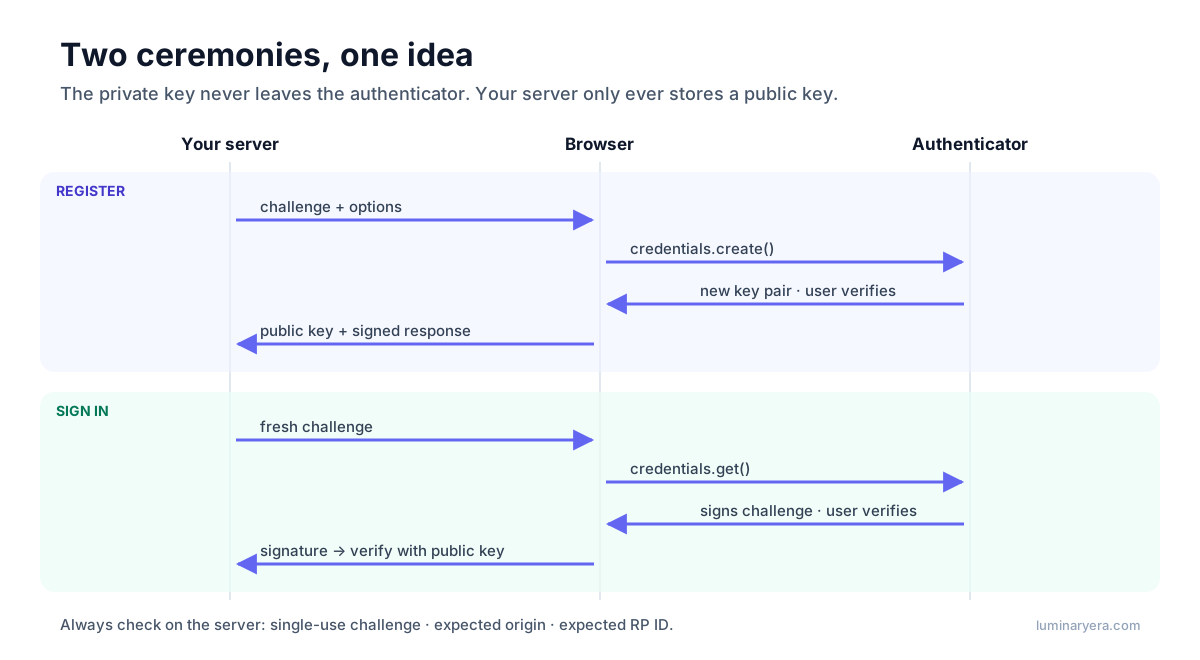
The two ceremonies
WebAuthn defines two flows, called ceremonies, and both follow the same four-step shape:
- The server generates options, including a fresh random challenge, and remembers the challenge.
- The browser passes the options to the WebAuthn API:
navigator.credentials.create()for registration,navigator.credentials.get()for authentication (see MDN's Web Authentication API reference). - The user verifies with their authenticator, and the browser returns a response.
- The server verifies the response against the challenge, its origin and its relying-party ID, then stores or checks the credential.
The raw API involves binary data, CBOR-encoded structures and a fair amount of verification logic. Don't write that yourself. Use a maintained library. The examples below use SimpleWebAuthn, a widely used TypeScript library with separate server and browser packages (@simplewebauthn/server and @simplewebauthn/browser); libraries with similar shapes exist for most server languages.
One requirement before you start: WebAuthn only works in a secure context. That means HTTPS in production; browsers make an exception for localhost during development.
Registration: creating a passkey
Registration usually happens when a signed-in user chooses to add a passkey, or at sign-up. On the server, generate options and store the challenge in the user's session:
import { generateRegistrationOptions } from "@simplewebauthn/server";

const rpName = "Example App";
const rpID = "example.com";          // your registrable domain, without scheme or port

export async function startPasskeyRegistration(user: User) {
  const existing = await db.passkeys.findMany({ where: { userId: user.id } });

  const options = await generateRegistrationOptions({
    rpName,
    rpID,
    userName: user.email,
    attestationType: "none",
    // Stop the same authenticator registering twice for this account.
    excludeCredentials: existing.map((c) => ({ id: c.credentialId, transports: c.transports })),
    authenticatorSelection: {
      residentKey: "required",        // discoverable credential, needed for passkey autofill
      userVerification: "preferred",
    },
  });

  await saveChallenge(user.id, options.challenge); // e.g. in the server-side session
  return options;
}
In the browser, pass those options to the library and send the result back:
import { startRegistration } from "@simplewebauthn/browser";

const optionsJSON = await fetch("/api/passkeys/register/options", { method: "POST" }).then((r) => r.json());
const registration = await startRegistration({ optionsJSON });
await fetch("/api/passkeys/register/verify", {
  method: "POST",
  headers: { "Content-Type": "application/json" },
  body: JSON.stringify(registration),
});
Note the single object argument. In current versions of SimpleWebAuthn, the browser functions take { optionsJSON }; passing the options directly is the older form and no longer works.
Back on the server, verify and store the credential:
import { verifyRegistrationResponse } from "@simplewebauthn/server";

export async function finishPasskeyRegistration(user: User, body: unknown) {
  const expectedChallenge = await takeChallenge(user.id); // read and delete: one use only

  const { verified, registrationInfo } = await verifyRegistrationResponse({
    response: body as any,
    expectedChallenge,
    expectedOrigin: "https://example.com",
    expectedRPID: rpID,
  });
  if (!verified || !registrationInfo) throw new Error("Passkey registration failed");

  const { credential, credentialDeviceType, credentialBackedUp } = registrationInfo;
  await db.passkeys.create({
    data: {
      userId: user.id,
      credentialId: credential.id,
      publicKey: Buffer.from(credential.publicKey).toString("base64url"),
      counter: credential.counter,
      transports: credential.transports ?? [],
      deviceType: credentialDeviceType,   // single-device or multi-device (synced)
      backedUp: credentialBackedUp,
      createdAt: new Date(),
    },
  });
}
attestationType: "none" is the right choice for most apps. Attestation lets you verify which make and model of authenticator created a credential, which matters in regulated environments that only allow approved hardware. For everyone else, it adds complexity and privacy concerns without benefit.
Authentication: signing in with a passkey
Because passkeys are discoverable credentials, the user doesn't need to type a username first: the authenticator knows which accounts it has for your site. Generate options without listing specific credentials:
import { generateAuthenticationOptions, verifyAuthenticationResponse } from "@simplewebauthn/server";

export async function startPasskeyLogin(sessionId: string) {
  const options = await generateAuthenticationOptions({ rpID, userVerification: "preferred" });
  await saveLoginChallenge(sessionId, options.challenge);
  return options;
}

export async function finishPasskeyLogin(sessionId: string, body: { id: string }) {
  const expectedChallenge = await takeLoginChallenge(sessionId);
  const passkey = await db.passkeys.findUnique({ where: { credentialId: body.id } });
  if (!passkey) throw new Error("Unknown passkey");

  const { verified, authenticationInfo } = await verifyAuthenticationResponse({
    response: body as any,
    expectedChallenge,
    expectedOrigin: "https://example.com",
    expectedRPID: rpID,
    credential: {
      id: passkey.credentialId,
      publicKey: Buffer.from(passkey.publicKey, "base64url"),
      counter: passkey.counter,
      transports: passkey.transports,
    },
  });
  if (!verified) throw new Error("Passkey sign-in failed");

  await db.passkeys.update({
    where: { credentialId: passkey.credentialId },
    data: { counter: authenticationInfo.newCounter, lastUsedAt: new Date() },
  });
  return passkey.userId; // create the session for this user
}
The credential ID in the response tells you which stored passkey, and therefore which user, is signing in. The signature proves the user holds the matching private key, and the challenge check proves the response is fresh rather than replayed.
Passkey autofill: the experience users actually want
A separate "Sign in with a passkey" button works, but many users won't notice it. The smoother approach is conditional mediation, often called passkey autofill: the browser offers the user's passkeys in the same autofill menu where saved passwords appear, right on the username field.
It takes three pieces, described in detail in web.dev's guide to passkey form autofill:
- Mark the username field with
autocomplete="username webauthn". - When the sign-in page loads, start a pending
navigator.credentials.get()call withmediation: "conditional". It waits quietly until the user picks a passkey from the autofill menu. - Feature-detect first. Current guidance uses
PublicKeyCredential.getClientCapabilities(); the olderPublicKeyCredential.isConditionalMediationAvailable()check is still widely used.
<input type="text" name="username" autocomplete="username webauthn" autofocus />import { startAuthentication, browserSupportsWebAuthnAutofill } from "@simplewebauthn/browser";
if (await browserSupportsWebAuthnAutofill()) {
const optionsJSON = await fetch("/api/passkeys/login/options", { method: "POST" }).then((r) => r.json());
// Resolves only if the user picks a passkey from the autofill menu.
const assertion = await startAuthentication({ optionsJSON, useBrowserAutofill: true });
await fetch("/api/passkeys/login/verify", {
method: "POST",
headers: { "Content-Type": "application/json" },
body: JSON.stringify(assertion),
});
}If the user types a username and password instead, the pending request simply never resolves, and your existing login form works as before. That's what makes autofill such a good migration path: users who have passkeys get the faster sign-in, and nobody else has to change anything.
Getting users to create passkeys
Implementation is the easy part. Adoption depends on asking at the right moment. The guidance from passkeys.dev and browser vendors converges on a few patterns.
Ask right after a successful sign-in. The user has just proven who they are, so it's the natural moment to offer: "Sign in faster next time with a passkey." Before showing the prompt, check that the device has a platform authenticator, for example with PublicKeyCredential.isUserVerifyingPlatformAuthenticatorAvailable(), so you don't offer something the device can't do.
Offer it at sign-up. New accounts can create a passkey as their first credential, keeping a password or email-based fallback where your product needs one.
Offer it on new devices. If a user signed in with a passkey from another device, such as a phone scanning a QR code, offer to create a passkey on the current device so next time is one step.
Consider conditional create. Newer browsers support creating a passkey automatically, without an extra prompt, right after a user signs in with a password saved in their password manager. SimpleWebAuthn exposes this as startRegistration({ optionsJSON, useAutoRegister: true }). Feature-detect it and treat it as a bonus rather than the main path.
Whatever you do, give users a settings page that lists their passkeys with friendly names, creation dates and last-used times, and lets them add and remove passkeys. People need to see what they have before they trust it.
Storing credentials and logging events
For each passkey, store the credential ID, the public key, the signature counter, the transports, whether it's backed up (synced), and timestamps for creation and last use. A user can have many passkeys, so use a separate table keyed by credential ID rather than columns on the user record.
A note on the signature counter. It was designed to detect cloned authenticators: each use should increase it. Many synced passkeys always report zero, which is expected rather than suspicious, and libraries account for it. Store it, update it, and don't build your own alarm logic around it without understanding those cases.
Log registrations, sign-ins and failures with the credential ID and user, so you can investigate account problems and spot unusual patterns. Never log challenges after use or full request bodies with personal data.
Passkeys and your existing two-factor authentication
If your app already has two-factor authentication, a reasonable question is how passkeys fit in. The short version: a passkey sign-in with user verification already combines two factors. The user has something (the device or password manager holding the private key) and proves something about themselves (the fingerprint, face scan or PIN that unlocks it). For that reason, most services treat a successful passkey sign-in as satisfying their multi-factor requirement and don't ask for a one-time code afterwards. Asking for one anyway adds friction without adding much security, and it trains users to see passkeys as just another step.
That depends on actually requesting and checking user verification. If your options set userVerification to "preferred", the verification result tells you whether the user was verified for that particular sign-in. Where your policy requires two factors, check that flag on the server and fall back to a second factor when it wasn't satisfied.
Existing second factors still have a role. Keep authenticator apps or hardware keys available for users who haven't created a passkey, and as part of account recovery. Plan to phase out SMS codes over time where you can: they're the weakest common second factor, and once users have passkeys they become mostly an attack path rather than a protection.
Security details that matter
- Challenges must be single-use and short-lived. Generate them on the server, store them in the session, and delete them as soon as they're checked. A reusable challenge reopens the door to replay attacks.
- Pin the expected origin and RP ID. Configure them explicitly per environment. The RP ID is your registrable domain, such as
example.com, which also covers subdomains likewww.example.com; passkeys created under one RP ID won't work under a different one, so choose it carefully before launch. - Keep sessions as strong as the sign-in. Passkeys protect the login step. Session cookies still need
HttpOnly,Secureand sensibleSameSitesettings, plus expiry and revocation. - Re-verify for sensitive actions. For changing an email address, removing a passkey or exporting data, ask the user to verify again with a passkey.
- Don't weaken everything else. If attackers can still reset an account with a guessable security question or an SMS code, that becomes the new weakest link. Passkeys raise the bar only if recovery doesn't lower it again.
Testing passkeys without a drawer full of phones
Passkey flows involve a browser, an operating system prompt and an authenticator, which sounds hard to test automatically. Fortunately, browsers provide virtual authenticators for exactly this purpose.
For manual testing, Chromium-based browsers include a WebAuthn panel in their developer tools where you can enable a virtual authenticator environment, add authenticators with different capabilities (platform or roaming, with or without resident keys and user verification), and inspect the credentials they hold. It's the fastest way to step through registration and sign-in while developing, and to test what happens when a user has no passkey, several passkeys, or an authenticator that doesn't support user verification.
For automated tests, the same capability is exposed through the Chrome DevTools Protocol, which test frameworks such as Playwright and Puppeteer can drive. A test can add a virtual authenticator, run the registration flow through your real UI, sign out, sign back in with the stored credential, and assert on the result, all without a physical device. The WebDriver standard defines similar virtual authenticator commands for Selenium-based setups.
Worth covering in your test suite:
- Registration and sign-in with a passkey, end to end.
- Autofill sign-in on the username field, and the fallback to password when the user ignores it.
- A second registration attempt from the same authenticator, which
excludeCredentialsshould prevent. - A replayed or expired challenge, which the server must reject.
- A response sent to the wrong origin or relying-party ID, which verification must reject.
- Removing a passkey, and confirming it can no longer sign in.
Virtual authenticators can't fully reproduce every real-world device and password manager, so keep a short manual checklist for the platforms your users actually use, and run it before major releases.
Common implementation mistakes
- Generating challenges in the browser. The challenge must come from your server and be checked by your server. A client-generated challenge proves nothing.
- Reusing challenges. Store each challenge with a short expiry and delete it after the first verification attempt, successful or not.
- Different RP IDs across environments by accident. Passkeys created on a staging domain won't work in production, and a passkey created on
www.example.comwith that full hostname as its RP ID won't work on another subdomain. Decide the RP ID deliberately before launch. - Storing the public key in the wrong encoding. Libraries return binary data. Pick one encoding, such as base64url, store it consistently, and convert back to bytes when verifying.
- Forgetting
excludeCredentials. Without it, users can register the same authenticator repeatedly and end up with confusing duplicate entries. - Treating a missing passkey as an error. With autofill, a pending request that never resolves is normal: the user simply chose a password. Don't log it as a failure or block the form.
- Hiding passkeys from users. Without a management page, users can't tell which devices hold their passkeys or remove one from a lost device.
Account recovery: the part that decides success
Synced passkeys survive a lost phone, because they live in the user's platform account or password manager. But people still lose access: they leave an ecosystem, get locked out of their platform account, or only ever had a device-bound key. Your recovery design determines whether passkeys feel safe or scary.
- Encourage more than one passkey, for example one on a phone and one on a laptop or a hardware key.
- Keep a recovery method appropriate to your risk: a verified email link, recovery codes shown once at setup, or identity verification for high-value accounts.
- Don't remove passwords on day one. Let passkeys become the preferred method first. Once most active users have one, you can offer passwordless-only accounts as an opt-in for those who want them.
- Notify on changes. Email users when a passkey is added or removed, so an unauthorised change doesn't go unnoticed.
A rollout plan
- Build the ceremonies with a maintained library and add the passkey table. Test on the main platforms your users have: recent iOS and Android devices, macOS and Windows, and the major browsers.
- Ship a settings page where signed-in users can add, name and remove passkeys.
- Turn on autofill on the sign-in form, alongside the existing login.
- Prompt after sign-in on capable devices, with a clear "not now" option, and measure acceptance.
- Watch the numbers: registration success rate, sign-in success rate, how often users fall back to other methods, and support tickets about sign-in.
- Revisit recovery once you know how users actually behave, and only then consider passwordless-only accounts.
Frequently asked questions
What is a passkey?
A passkey is a sign-in credential based on public-key cryptography and the WebAuthn standard. The user's device or password manager holds a private key unique to your site, and your server stores only the matching public key. Users unlock it with a fingerprint, face scan, PIN or device password, and it can't be phished or reused on other sites.
Are passkeys more secure than passwords?
Yes, in several important ways. Passkeys are bound to your domain, so phishing sites can't use them; your server stores only public keys, so a breach exposes nothing reusable; and each passkey is unique, so credential stuffing doesn't work. Account recovery must also be strong, or it becomes the weakest link.
How do I add passkey login to my website?
Use the WebAuthn API through a maintained library such as SimpleWebAuthn. Implement registration with navigator.credentials.create and authentication with navigator.credentials.get, verify every response on the server against a single-use challenge, your origin and your relying-party ID, and store each credential's ID, public key and counter. Add passkey autofill on the username field for the smoothest experience.
What happens if a user loses the device with their passkey?
Synced passkeys are stored in the user's platform account or password manager, so they remain available on the user's other devices. For device-bound passkeys or lost accounts, you need a recovery path such as a second passkey, recovery codes or a verified email flow, chosen according to the risk level of your application.
Should I remove passwords when I add passkeys?
Not at first. Offer passkeys alongside existing sign-in methods, prompt users to create one after they sign in, and let passkeys become the preferred option. Once most active users have passkeys and your recovery process is proven, you can offer passwordless-only accounts as an option.
The takeaway
Passkeys are one of the rare security improvements that also make the user experience better. The code is manageable with a good library: two ceremonies, a credentials table and careful server-side verification. The real work is product work: asking at the right moment, giving users visibility over their passkeys, and building recovery that's as strong as the sign-in. Get those right and "I can't log in" tickets start to look like a relic of the password era.
Author at LuminaryEra
The LuminaryEra editorial desk publishes long-form, hands-on guides on AI-assisted development, large language models, developer tools and web engineering. Articles are researched and drafted with the help of AI tools, link to their sources, and are corrected when readers report errors.
View all articles